13 Apr 2013

Red caviar manicure

Hi girls!

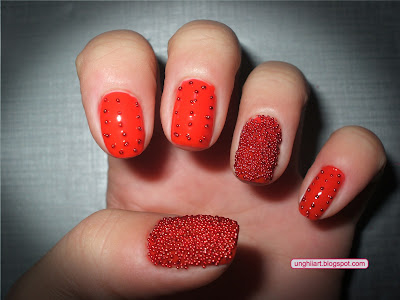
Today i'd like to show to you how to made step by step a nice red caviar manicure. This beautiful model  is perfect for beautiful events from your life. For a better look, the polish and the pearls must have the same color. This nails design is for special events.

If you want to make this model you will need a red polish and some red pearls.
Step 1: Apply one layer with base coat.
Step 2: Apply two layers with red polish.
Step 3: Apply the pearls, press them gently and wait to dry about 10 minutes.
Step 4: Apply a layer with top coat.

As always, thank's for watching! If you have any questions, i'll be very happy to answer.

11 Apr 2013

Ladybugs nails

Since outside is so cold, I thought that I can reduce the cold feeling by making a new joyful design with small ladybugs and flowers.


For this model you will need: a white polish, a red one and a black one, and of course a dots instrument and a brush.

Step 1: Apply a base coat layer

Step 2: Make a simple white and red french manicure like in the image bellow.


Step 3: draw small red flowers using the dots instrument. 


Step 4: using the dots instrument make two red dots like in the picture bellow.


Step 5: with a soft brush draw the ladybug legs and some small dots on the back, with the black polish and the eyes with white polish.  


Step 6: apply one layer of top-coat. These will intensify the brightness of the nail.

Thanks’ for watching!

Dots french manicure

It's been a while since I didn't make a model for small nails, tha's why I chose to use dots. Why?! Because dots stand out, without making the nails look small.

For this model I used a pink nails polish in the background, and on top of that a dark mauve to make french manicure.
What do you you need: 
One pink nails polish
One dark mauve polish
One dots intrument.
Step 1: Apply one layer of base coat polish
Step 2: Apply the pink polish on the nail


Step 3: With the dots instrument create small dots using dark mauve polish.
Step 4: Apply one layer of top-coat.

Thank you and see you next time!

3 Mar 2013

Spring flowers

This manicure is perfect for spring season. Is very easy to do at home as you can see below.

For this manicure you need: a white polish, a red polish, a pink polish, an dots instrument and some nails crystals.
Step 1: Apply one layer on every nail with base-coat (optional).
Step 2: Apply one or two layers with pink polish.

Step 3: With dots instrument make the flowers petals like in image below.
Step 4: With an dots instrument make the flower like in this tutorial.
Step 5: Stick the crystals in the center of the flowers.
Thanks!


Ladybugs nails

Hi girls!

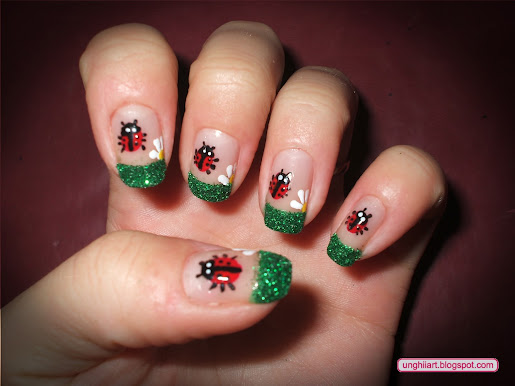
Outside is spring, the weather is becoming more beautiful, so it's time to present to you a french manicure with ladybugs. It is a happy and colorful manicure that suits the beautiful weather outside.

 For this model you need: nail polishes (colorless, green, white, red, yellow and black), some green glitter, an dots instrument and a fan brush.
Step 1: Apply one layer with base-coat (optional)
Step 2: Make a simple french manicure with the green polish like in image below.
Step 3: Apply one layer with the colorless polish and after that put your nail in the box with glitter. After that, use the fan brush to remove the excess glitter.
Step 4: With the dots instrument make a red dot on every nail.
Step 5: With the black polish paint the head of ladybug and the central line on the wings.
Step 6: Also with the black polish make the legs and the antennas.
Step 7: With the white polish make three petals and with yellow one paint a dot at the base of the petals.
I hope you enjoyed this model nails!


2 Mar 2013

Snowdrop nails

Spring came and I thought to show to you a perfect model for this time of the year.

For this nails model you need  a nude polish, a green one and a white polish.
Step 1: Apply a layer or two with the nude polish.
Step 2: With a special brush paint the snowdrop on the nail, and then make the outline with the green polish like in image below.
Step 3: For the clover paint three or four hearts with the dots instrument. ( I chose four because I consider myself lucky! :) )
Step 4: Apply the final layer with the top-coat!

This is my manicure for spring!
I wish you all a beautiful spring full of joy and fulfillment!

5 Feb 2013

Valentine's day nails

Hi!

Valentine's Day is coming so i  want to show you how it's made this beautiful manicure.

For this model you need: a red nails polish, a white one and the dots instrument (optional base coat and top coat).
Step 1: Apply the base coat.
Step 2: Apply one layer with the red polish.
Step 3: Make the hearts with dots instrument.
Step 4: Apply some dots at the base of your nails.
Step 5: Apply the top coat.
Below you have a video tutorial to understand exactly how to make this model.
Thank's for watch this post!